

Friday, February 26, 2010
Jimmy Miracle
Thursday, February 25, 2010
T-Shirt Makeover- Quick and Granny
The whole granny-chic thing has been around for a while now, but doilies have really taken the spotlight lately. (Have you seen the Megadoily?!) I've been itching to stick some doilies on everything, so I was really excited to see a bin of little 99 cent ones at Joann's the other day. (I know, it would be much cooler if they were actually vintage doilies, but whatever, we're faking cool here.)
Today, I realized that they belonged on this $5 Target tshirt I had. Here's what I did:

First, layout the doily arrangement on the shirt. I ended up trying the shirt on to do this, which was really helpful in showing me that my original 3 doily plan would have looked like way too much on me.

Take shirt back off and loosely pin everything in place.

Now turn the shirt inside out and put a scrap of fusible interfacing over the doily area. Make sure the fusible side is down, and draw the general shape of where the doilies are, maybe even a little bit larger than where they are.

Cut it out. Then take off the doilies so you can iron down the interfacing. (If you don't have interfacing, you could try this project without it, but it really helps to stabilize the stretchy tshirt material so you don't end up with something heinous that makes you curse your machine and never try sewing ever again.)

Turn right side out and pin the doilies back in place. Make sure you pin any parts that fold down under the collar well. Stitch in place. I went down the edge of the collar, back around the outsides of both doilies, and then stitched a circle closer to the center of each one. I tried to stay on the chunkier parts of the crochet so that you don't see as much thread on the shirt.
Trim loose threads and that's it. Go have a cookie.
Now here's a picture-of-myself-in-the-mirror-with-the-camera-blocking-my-face-shot for you:

I like it with a cardigan. Now all I need is spring.
Tuesday, February 23, 2010
Four Things
1. I found a very cool website at work last week called Block Posters. You upload any image, choose how big you want it to be, and they create a pdf file of your image on multiple pages that you can print out. This may not sound that exciting immediately, but think about the creative possibilities!
For my job, I write children's church curriculum. There is a series coming up in April about generosity, and this is the original image I created for the logo:

This is how it looked printed out from Block Posters:

You could do some really cool stuff with this for home decor. Look around their gallery for more ideas.
2. UO online has a lot of their apartment stuff on sale. I got a pretty new shower curtain for $9.99, and a few other cheap things for upcoming projects.
3. Free printable Marie Antoinette paper doll. Enough said.

4. Hello from Hendrix. He is really into exploring the musical intricacies of the xylophone right now... also hitting everything in sight with the mallet.

Sunday, February 21, 2010
OBSESSED WITH: Yellow Chairs
You heard me. Yellow chairs. I would like one in every room of my home.

Actually, the reason I am obsessed with these as of late is because I need a couple of dining room chairs, pub-height. We do have all four that came with our black dinette set. But I have commandeered one as my sewing chair upstairs. The other has a booster seat strapped onto it, and a nice layer of dried-on food that I will probably need an industrial sander for. Of course, I can't afford any of the above, but I have been thinking about buying a couple of mismatching ones on Craigslist, then painting those along with the 2 remaining dining chairs a nice shade of mustard.
I haven't consulted Nick about this, he may hate yellow... Just one more thing we really should have talked about before we got married. I gotta go rethink some stuff...
Saturday, February 20, 2010
Yup.
"Oh, good morning Mommy! (Big smile.) At some point in the night I puked all over myself and everything in my bed- so have fun with that!"
Thursday, February 18, 2010
Baby Gift: Onesies
I made some more appliqued onesies for new baby boys this week. (You can see some others here.)
These came out nicely:


These came out nicely:

This one turned out like a piece of poo:


My tension decided to rebel and mocked my attempts at adjustment. Then the machine ate the onesie material which made those big puckers. I cursed profusely. Then I gave up on this one. It was my favorite new design too...like a little baby tribute to Colonel Sanders. Because, you know, babies do come right out craving KFC.
Blast.
Tuesday, February 16, 2010
Tablecloth Makeover/ Dining in the Aviary

I gave my old plain grease-stained black tablecloth a facelift this week with just a long piece of fabric.
- Cut your fabric to the size you need, making sure it is at least 2-3 inches longer than the tablecloth or whatever you are covering.
- Fold both long sides of the fabric under half an inch, press and pin.
- Lay tablecloth flat on floor, lay fabric over it. Center the width by measuring the distance from the edge of the fabric to the edge of the tablecloth and making sure they are equal on both sides. Do this on the top, middle, and bottom so it is lined up all the way down.
- Once you are satisfied it is centered, go back to the pins that are already in the fabric and pin them again threw both layers, still keeping your pressed edge folded under.
- Sew down both sides, leaving a quarter inch, like this:

- Now you should have about an inch and a half of the un-hemmed fabric hanging off both ends. Fold under half and inch and press, fold over again so that it is all the way under the tablecloth fabric and pin.
- Sew down both of those sides. This is the underside of that seam:


Give it another good ironing and you're done. It's really simple, but for some reason that explanation doesn't seem that simple. I promise it is.
And now I have yet another bird thing in my dining room. I really didn't mean to get all theme-y in here, it just kind of happened over time.

This little bird is from a vintage shop in Charleston, and the ducky candle holder is from a local thrift store.

This set of owl playing cards is from an antique store in Old Milford.

This and the other 2 framed prints in the first photo are also thrifted.
So that's how the birds took over this room.
Today's crafting soundtrack: The Welcome Wagon. If you are going through Sufjan withdrawals like I am since he got all existential and decided not to make music anymore, you might like them.
Sunday, February 14, 2010
A Family Weekend
This weekend my parents were in town visiting from Tennessee. I love getting to see my parents, and HG was also very excited to have quality time with Nana and Grandpa. We ate good food, we shopped, we watched movies. (We made them watch Once last night and they really liked it- how cool are they?)
If you live in Cincinnati you can probably relate to this- when visitors from out of town come, it usually means a trek up 75 for a marathon afternoon of Ikea and Jungle Jim's, the most amazing grocery store ever. Really, calling it a grocery store is quite an understatement. It's more like a magical foodie wonderland, something that everyone who likes to consume nourishment should experience.
And visiting those 2 places, for me, also means spending a little money I did not intend to spend.
"Yeah, I don't need anything, but we can definitely go to Ikea if you want. It will be fun."
"What? This set of cookie cutters shaped like woodland animals is only $1.99! I must have it."
"How did I end up spending more money than you guys? Yes, I will take a big blue plastic bag please."
I am weak.

My most beloved purchase of the day is this little $4 succulent and pretty white pot. I have wanted a succulent. Now I have a succulent.

I love love love having plants in the house, but I kill them. I am under the impression that these are easier to take care of. If you also enjoy these, you should look around here.

And of course, I can never walk away empty handed from the fabric corner. I love that Ikea has so many great gray choices, because no one else does. This origami animal print is brand new and I'm smitten with it. I have no idea what I'll make with it, but it will be very cool.
Now I'm going to drink wine and eat European cheeses and jams from the jungle. Happy VDay everyone.
Saturday, February 13, 2010
Anti-Valentine's valentines
If you don't love love love Valentine's Day...
But you kind of secretly like it...
But you also think it's kind of commercial and useless...
But you do have a Valentine you really love and who has a twisted sense of humor like you...
You might want to print them out one or two of these subversive valentines.


But you kind of secretly like it...
But you also think it's kind of commercial and useless...
But you do have a Valentine you really love and who has a twisted sense of humor like you...
You might want to print them out one or two of these subversive valentines.


(found here.)
Thursday, February 11, 2010
A Challenge...that I'm not taking
Yesterday I found a very pretty blog called Dottie Angel. (Thru this famous crafty blog.)
The author has taken this challenge for herself, and invited others to join her:
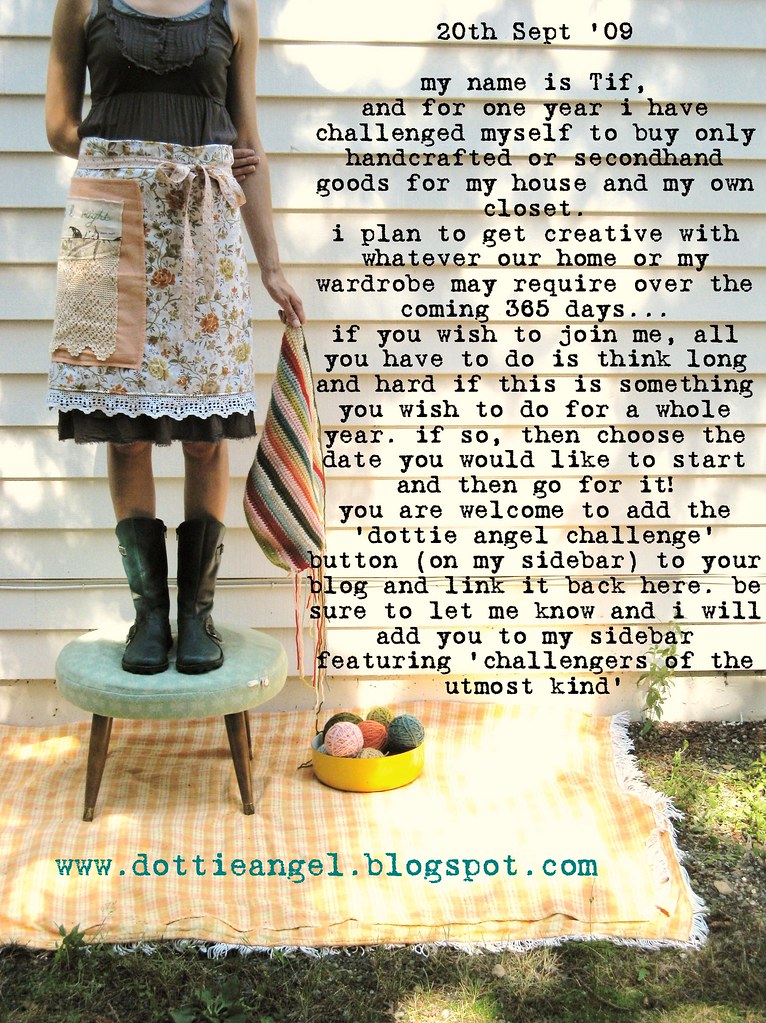
I absolutely love this idea. There are many reasons it appeals to me, besides the obvious green and anti-corporate, anti-materialism schtick.
The author has taken this challenge for herself, and invited others to join her:
I absolutely love this idea. There are many reasons it appeals to me, besides the obvious green and anti-corporate, anti-materialism schtick.
- I already absolutely despise going shopping. I'm seriously bad at it and totally insecure about anything I purchase if Nick isn't there to reassure me. (He has very good taste.)
- Despite hating to shop, I do love thrifting. There is something very exciting about finding something old that someone else cast aside that I find useful or pretty. I've loved it since middle school, thanks to my amazing friend Ruth.
- I love resourcefulness. I'm more MacGruber than MacGyver, but I like to think my developing handmade skills are helping to sharpen the resourceful, how-else-could-this-be-used part of my brain.
Still, I'm not ready to jump on board just yet. Here is my list of reasons (excuses) why not:
- Thrifting involves time hunting, which I don't mind, it's just that we are a one-car family. Believe me, if I had the means, I would love to spend some of my days off from work scavenging old smelly stores like a hyena.
- I'm seriously considering returning to full-time gainful employment in the near future. This would definitely involve purchasing some clothes slightly more professional than my cheap stretchy jeans and collection of worn-out threadless t-shirts.
- I'm still very unfamiliar with my post-baby body. Yeah, I'm not 40 lbs over weight or anything, but still, whose body is this? I got rid of all the old body's clothes, yet I still don't know how to dress this one. Sometimes it helps to just buy the new body some cheap Target clothes to make it feel better. And I'm still not a good enough seamstress to completely make my own wardrobe.
So there you go. Really pretty anti-climactic to share this idea with you that I don't even have the b@#*s to try myself. But it's still a very interesting idea, and maybe one day soon when my excuses run out, I will be ready to give it a try.
(also, don't worry, I think she excuses buying new undies.)
Tuesday, February 9, 2010
Introducing the Boo-Boo Bunny (with tutorial)
My husband just looked at me like I was crazy when I told him about the boo-boo bunny, but at least I know my mom will appreciate this post :)

When I was a kid, my family had a "boo-boo bunny." It was this little terry cloth pocket that you could put an ice cube in and hold onto your various kid boo-boos. Now, I had a wonderful childhood, but I don't often remember many details like that from it. Ask anyone who knows me, I just have a horrible memory when it comes to that stuff. (Although, for some reason I can remember any song lyric that was ever on the radio in the 80's and 90's, and who sang it. Useless really.)
I guess this is just memorable to me because it was all about comfort, which is big for a child. I have no idea what happened to boo-boo bunny, but I had a little terry cloth leftover from HG's new towels, so I decided to make one for my kiddos.
Thiiiis is hoooow we doooo i-iit:
(Whatever happened to Montell Jordan?)


Saturday, February 6, 2010
OBSESSED WITH: Kimono Style Robes
Call me old-ladyish for this one, but I don't care. I've wanted one ever since I saw Anjelica Huston in The Life Aquatic. It's just the classy way to do lazy...


1. Indian fabric from Plum Pretty Sugar
2. Short length from Natori
3. Simple black from Calvin Klein
4. Asian print from Ms. Wood
5. And just for fun, fake-British accent, Japanese-influenced, zombie-complexioned Madonna from the 1999 Grammys. Ah, thank you Madonna. We can only aspire to such constant self-reinvention.
Friday, February 5, 2010
Hooded Towels/ High Chair Tomfoolery

HG is long past too big for his little newborn towels, but that's all he had- until yesterday when I made 4 hooded towels from this tutorial. It was really easy, but if you do it go ahead and look at their 2nd explanation of that tutorial also. (By the way, if you haven't looked around Prudent Baby yet, you really should. The site is only a few months old, but they have tons of really great DIYs, and not just baby stuff. Also check out their Prudent Advice blog if you are ever feeling all reflective about motherhood.)

What's great about this towel is that the hood is in the middle of the long side, instead of the corner, so it's easy to completely wrap up that little baby chiminichanga in lots of extra towel. And bonus- the hood is extra pointy like a little gnome hat.

Instead of using a hand towel and a bath towel like they recommend, I just bought some terry cloth at Joann's. I think it was $5 a yard, and I used one yard per towel. So you would have to find a really good towel sale to beat that. HG obviously finds it soft and luxurious...
Yeah, speaking of how adorable he is, don't be deceived. Not everything he does lately is so adorable. He turns 10 months tomorrow and he is already quite the strong-willed little toddler. When you learn how to walk at 7 months, I guess lots of early shenanigans and foolishness come too.
His latest rebellion is purposely dropping his food on the kitchen floor.

That's a nice little pile of tomatoes he has slowly and meaningfully held out over the floor and dramatically released from his sticky little right hand. I swear, every time he does it, he looks at me and thinks, "What do you think about that, Mom? What are you going to do about it?"
And it's not because he doesn't like the food. He loves tomatoes. He loved the bananas he did it with this morning. What a booger. A painfully cute little booger face.
Are there any parents out there who have won this battle? I'd seriously love suggestions because at this point I've tried everything short of beating him with a wooden spoon. (ok, probably haven't tried EVERYthing...)
And don't try and tell me it's just one of those phases you have to deal with- that's bull. I'm the parent. I'm in charge. He shouldn't throw his food on the floor on purpose. End of story.
but oh man, he really is an adorable little booger :)
Wednesday, February 3, 2010
I'm addicted
to making these Louise bags. I made 4 more this week.
Some are for friends, some are for Fyrefly photography. They've commissioned me to make them for brides they book. Each bride from now on gets one of these, filled with goodies to help them plan their wedding. How cool is that?


Some are for friends, some are for Fyrefly photography. They've commissioned me to make them for brides they book. Each bride from now on gets one of these, filled with goodies to help them plan their wedding. How cool is that?


As you can you see, I'm really enamored with the combination of those three fabrics in the first bags. It's just perfectly unexpected without being matchy-matchy.
Today's crafting soundtrack: MGMT. Hendrix likes to robot dance.
"I'm feeling rough, I'm feeling raw, I'm in the time of my life..."
Subscribe to:
Posts (Atom)